Thursday, 3 December 2015

Apam balik

Apam Balik is a local food where you can find from the stalls along the street. This recipe is from Seasaltwithfood and it suppose to be thin and crispy at the outer edge and thick and soft inside however I've got a thin and crispy texture. My son and hubby loves it so much as I added extra creamy corn and peanuts

Apam Balik (Thick Version)
Yield: 2pcs of 30cm

Ingredients:

Batter
1 1/4 Cups All-Purpose Flour
1/2 tsp Baking Soda
1/2 tsp Instant Yeast
1 Large Egg
2 Tbsp Cane Sugar
1 Cup Water

Filling
2 Cups Roasted Peanuts, coarsely ground
1/2 Cup Cane Sugar

Instructions:
  1. In a bowl, whisk together all purpose flour, baking soda, instant yeast, egg, sugar, and water. Wrap the bowl and refrigerate for 5 hours or overnight.
  2. Lightly oil a small non-stick pan or a crepe pan (about 5 - 6 inches diameter) over a moderate heat (I used a 30 cm big pan).
  3. When the pan is hot, add about 1/2 cup of batter, evenly coating the pan. Cook for about 1 minute until the batter sets and form small bubbles.
  4. Sprinkle some sugar evenly and cover with a lid. Cook for another minute.
  5. Then sprinkle some ground peanuts on top of the pancake. Continue to cook until the pancake is light golden brown in color.
  6. Loosen the edges with a palette knife. Fold the pancake into half, and transfer it onto a plate.
  7. Slice into 2 or 3 pieces and serve warm. 
Pin It Now!

Wednesday, 8 July 2015

Steam Rice Cake @ Pak Tong Kou

I remember my dad use to buy steam rice cake (pak tong kou) for me as late night supper from a stall in Penang. My dad first introduce me to this cake when I'm about 8-9 years old and he told me that there is a type of cake which is as white as snow, springy, tasted tangy and sweet. He brought me together to a roadside stall in Penang road and bought a piece for me. Just like what my dad told me the cake looks simple but it's really nice.I love it so much and it became one of my favorite dessert since then. Nowadays it's easy to find this cake in the wet market but not all of them selling the right texture and it doesn't taste the same like before. I got to read the recipe from wendyinkk and the process of doing this cake is rather long and being a lazy person I did not try and choose to buy rather than doing it but somehow, someday I will try to make it, I knew this. Finally I read about a simpler version of making this cake, the ingredients and process is really simple and so I thought I should give it a try. I am awed looking at the honeycomb formed, and I quite like it although it doesn't taste as good as the cake I use to ate those days because it lack of the rice wine yeast smell. But I am happy with the result although the colour of the pak tong kou is not as white as those selling out there....

Steam Rice Cake @Pak Tong Kou (adapted from MyKitchenSnippets)
Yield: One 8" pan

Ingredients

(A)
280gm rice flour
300ml water

(B)
300ml water
280gm castor sugar (I use 200gm)
1/2  tsp salt
3-4pcs of pandan (screwpine) leaves

(C)
1 tsp dried yeast + 3 tbsp lukewarm water

Instructions:

  1. Add in (A) into a mixing bowl and mix well.
  2. Add in (B) into a saucepan and bring it to boil. Once boil remove pandan leaves and pour the syrup mixture right into (A), mix well and leave aside to cool.
  3. Dissolve yeast in the lukewarm water and pour in the cool rice flour mixture. Stir well, cover and set aside for fermentation process for about 1 1/2 or 2 hours or until tiny bubbles are formed on top of the batter.
  4. Prepare the steamer and bring the water to a rapid boil. Grease and preheat an 8" square or rectangle pan.
  5. Add in 1/2 tbsp of the vegetable oil into the mixture, stir well and pour into the heated tray and steam the mixture for 20 minutes or until the skewer comes out clean when tested.
  6. Grease the top part with some oil and wait for it to cool completely before cutting it.

Note:
For a firmer texture, you may add 1/4 tsp of alkaline/lye water into the tray before pouring the rice mixture.


Pin It Now!

Monday, 20 April 2015

Easy bread machine pandan kaya


I love 'kaya' (coconut egg jam) especially the kaya made by my grandma. I use to help her stirring the kaya to prevent it from burnt and turning lumpy. But now with the help of the bread machine this is lots easier. Just dump everything in the bread machine and after an hour your house will full of the pandan fragrance and then you are done.


Pandan kaya (bread machine method)
Yield: 7 bottle

Ingredients
500ml coconut milk (apptox. 2 old coconut milk)
500ml eggs (approx. medium size 10 eggs)
420gm castor sugar
10-15pcs of pandan (screwpine leave)

Instructions:
1. Cut pandan leave horizontally (about 1cm) and put into a blender.
2. Pour in the coconut milk and blend it finely.
3. Sieve the pandan coconut milk into the bread machine.
4. Then beat eggs with sugar till combine.
5. Pour in the egg and sugar mixture into the bread machine.
6. Select the jam function and let it do the wonders.
7. To have a smooth creamy kaya, you may use a hand mixer to blend it.

Note:
For those who don't have a bread machine, you may follow the above step from no. 1-5, then followed by the below steps.

1. Pour in the ingredients into a saucepan (preferably double boiler or double noil method) and cook under low fire.
2. Keep stirring until the mixture become thick and then it's done.


Happy trying!

Pin It Now!

Saturday, 11 April 2015

Cute Assorted Buns


My son doesn't really fond of soft textured food, so he told me that he doesn't like the bread that I've made. So I thought maybe I should bake some cute animal buns to attract him. He just ate too much stall bought kuih and bread, since I have my own breadmaker I thought it's better to let him ate more of the homemade bread/buns. I've googled to find some inspirations and the sleeping doggy bread bun and the piggy bread bun caught my attention, it is too cute and I thought my son would love this too. I've all the ingredients needed and so i gave it a try last Tuesday.

Cute Animal Buns
Yield: 11pcs 50gm bun and 3pcs 36gm bun
Ingredients
120gm water
60gm milk
3/4 beaten egg (balanced use for egg wash)
375gm bread flour
60gm sugar
1/4+1/8 tsp instant yeast
5pcs sausages (half)
raisins (enough for the eyes and nose)

Instructions:
  1. For breadmaker user: Add in all the ingredients according to your bread maker guide and set to dough function and let the machine knead for 30mins. When it's done, select the proofing function and let it proof for about 1 1/2 hrs.
  2. Hand method: Mix all the ingredients, except butter, in a large bowl to get a dough. Add in butter and knead until dough is springy and soft, this takes around 10 minutes. Then cover the dough with cling wrap and keep in a warm place for it to rise. This take around an hour and the dough should double in size. Do a finger check to check the readiness.
  3. While the dough is raising, soak raisins in water so that they will soften and expand. Dry them on a paper towel and set aside. These will be for the puppy's nose and piggy's eyes. 
  4. Once the dough is ready, punch out the air from the dough with your fist.
  5. Divide the dough to approximately twelve 50gm balls and three 36gm balls. Cover with cling wrap and let the dough rest for 15 minutes.                  
  6. Then follow steps of preparing the dough for each type of bun that you wanted to make.                                                                                                                                                                 For Puppy Bun
    - For the puppy bread, you'll need to divide the 50gm balls again into 35gm and 15gm ball.
    - Half 5 sausages, place a sausage in the middle of the 35gm ball, fold top and bottom and seal by pressing the dough together. Turn the sealed part face down. Seal and form one end as the tail, lightly twist and seal it to the body.
    - Cut the other end of the body to form the legs. Flatten the smaller (15gm) dough ball, make 2 cuts for the ears. Place the head on the body.

    For Piggy bun
    - Slice out 2pcs of sausage and cut one into half for the ears and use a skewer to poke two holes in the other one for the nose.
    - Take a 50gm ball, flatten it and insert 2 candy melts (chocolate) in the bun and seal it.                                                                                                                                      
    For Rope Cheese bun
    - Take a 36gm dough, make a rope from it and twist around the hotdog.                                                
  7. Cover with cling wrap and let the buns proof for 40 minutes.
  8. At the end of 40 minutes, gently place and press the raisins onto the puppy and piggy bun.  Place the ears and nose (hotdog) on the piggy bun. - Slice the cheddar cheese into strips and arrange on top of the rope cheese bun.                    
  9. Brush with egg wash and bake at 180 degrees celcius for around 15 minutes or till they turn golden brown. 
  10. Draw eyes using melted chocolate or food marker as creative as you are.
Top left: Puppy (hotdog) bun,  Left down:Piggy chocolate bun,
Down right: Puppy (hotdog) bun with chocolate deco,  Top right: Cheese hotdog bun
Pin It Now!

Monday, 6 April 2015

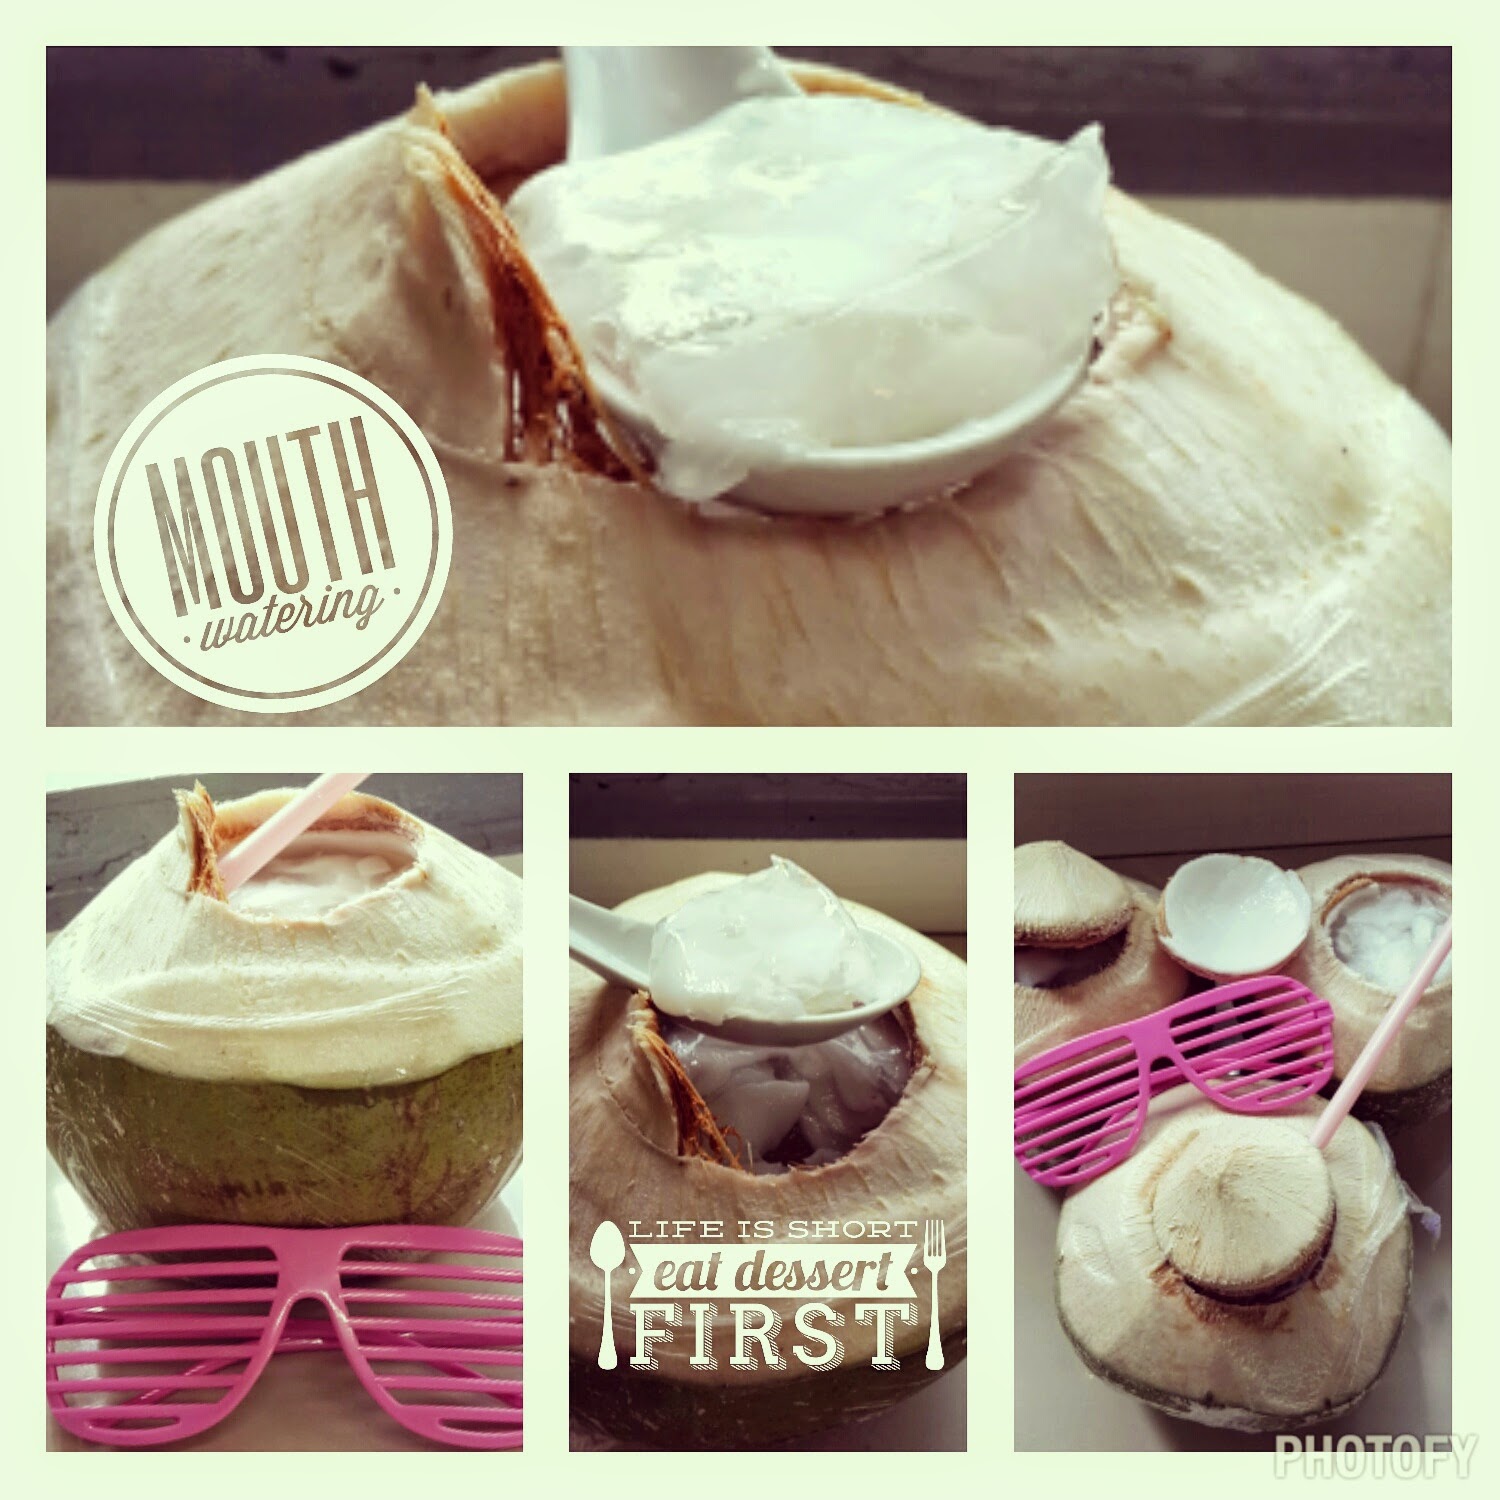
Coconut Jelly

It was a hot day and one of my colleague voluntereed to bought us the coconut. I've ordered one from him and brought back home to drink as I'm too busy with my work. But I've totally forgotten about it and the next day my colleague ask whether we would like to buy the coconut again and so many other colleagues have ordered from him again.Then only I realize that I'e totally forgotten about the coconut that I've bought previously. To cut the story short, I've ordered three more coconuts from him with the intention to make coconut jelly as my husband love coconut and jelly. It was so long since I ate the coconut jelly during my university days in Alor Setar and I regretted that I never thought of making it earlier. There's a saying, when we are single we neglected the family but after marriage and got our own children we'll try to make everything in order to please everyone and that's the job of  a human called 'mother'. As I grow older I understand the meaning and quite agree with it and started to appreciate my mum more. When i pass the coconut jelly to my mum she loves it so much and ask for a second one. Below is the recipe based on my assumption from what I've eaten years ago and just tested out last Saturday.

Coconut jelly
Yield: 4 coconuts for 4-8 ppl

Ingredients
4 coconuts
10gm agar-agar(jelly) powder
castor sugar - adjust according to your own tastebud

Instructions:
  1. Pour out the coconut water from the coconut to a jug with a unit marker and take the measurement*.
  2. Scrape the coconut flesh and remain some in the coconut.
  3. Transfer to a saucepan and stir in the agar-agar powder and sugar till it dissolve.
  4. Bring it to a boil and turn off the heat. 
  5. Combine the flesh in the mixture and pour in the individual coconut till full.
  6. Leave it on a table and let it set, then chill it in the fridge for at least 2-3 hrs and serve it.
Note:
  1. For jelly with a mould, the ratio of water to agar-agar powder that I'm normally using is 200ml:1g 
  2. I'm using 1375ml:10gm in this recipe for a firmer tetxture.
Pin It Now!

Sunday, 5 April 2015

Purple Sweet Potato Hei Ban (no kitchen gadget required!)

My son loves to eat 'Hei Ban' and we always bought for him from the kuih stall near our house and I've decided to try the recipe from Spice Up My Kitchen. The texture of the homemade Hei Ban is really soft and chewy due to the use of sweet potato. They rose higher compared to the stall bought one. If your little one like it too, you must give this a try as the homemade version is always healthier and the cleanliness is assured.

Purple Sweet Potato Hei Ban 
Yield: Approximately 12 pcs (+/- 50gm each)

Ingredients
A:
150gm mashed sweet potato (I use 140gm)

B
3gm instant yeast
50ml water (I use infused screw pine leaves (pandan) water)

C
125gm flour (I use 130gm cake flour)
125gm glutinous rice flour (I use 130gm)
75gm sugar
A bit of water

D
15gm oil (I use 10gm)
Banana leaves (I used non stick baking paper-no oil is required).

Instructions:
  1. To make the pandan infused water, wash pandan leaves (5-6 pcs) under running tap water and put in a saucepan containing 1 ltr water. Bring it to a boil, once it boils off the flame, put it aside and let it cold to room temperature. (This step can be done earlier)
  2. Peel purple sweet potato (any colour- yellow/orange/purple), steam until soften and mashed using a fork.
  3. Mix instant yeast with the 50ml pandan infused water and set aside. 
  4. Sieve flour and glutinous rice flour in a bowl and add in castor sugar, mashed sweet potato and pour in the yeast mixture a little bit at a time to form a soft dough. You may need to add in the extra pandan infused water if the dough is too dry.
  5. Apply some oil on the surface of the banana leaves (I omitted this) and add the rest of oil in the dough and mix well.
  6. Divide the dough into 50gm each, knead and mould into a sphere and lightly flatten the dough and put on top of the banana leaf.
  7. Repeat with the rest of the dough till finished and leave for 20-30 minutes. 
  8. Pour water in a wok and bring water to boil, use medium flame to steam the Hei Ban for 12 minutes. Turn off the flame, do not remove the lid immediately, but slighly open the lid and remove the Hei Ban from the work after 3 minutes.
Note:
  1. If the Hei Ban is fermented in a good condition, once you press the surface lightly, it will bounce back due to its elasticity.
  2. If the Hei Ban has excessive fermentation, it will has wrinkled skin.


Happy baking!
Pin It Now!

Thursday, 26 March 2015

Tang Zhong Method Fruit Bread

The bread doesn't do justice to the existence of strawberries!
I have read and heard about 'Tang Zhong' method bread and bun quite some time ago and how it magically turn the bread soft and fluffy and recently learnt about the 5C method but have not tried any of these method yet. I'm just too lazy to try earlier and I worry that if I failed to prepare the 'tangzhong' the whole bread will be ruined. Since there are so many good comments about it I think I shall give it a try this time. I've followed the recipe from TheWonderMummy and I've read from many websites and blog on how to prepare the 'tangzhong' before this, so that I can do it correctly. But if you never try, you can never get the hang of it, so you must try it yourself. I am using an induction cooker and a stainless steel saucepan and cook it under medium-low heat but within a few seconds or nearly a minute the 'Tangzhong' paste is form. I immediately stop the cooking by removing the saucepan and give it a stir to combine the half liquid and half paste form (as though the way we make glue in the olden days - it does smell like glue-starchy!). I then transfer it to a bowl, cover it with a cling wrap and let it cool down to room temperature. When it's cool down, I find that the moisture that trap in it makes it more runny compared to when it's cook earlier (yay succesful otherwise I'll have to redo). Ladies and gentlemen, I have to assure you that the Tangzhong method bread is really worth the effort and try, as it yields a really soft texture (even the skin) if compared to the normal bread.  I will surely use the Tangzhong method and never look back although it took a step more.

Tang Zhong Method Fruit Bread
Yield: One 750gm loaf

Tang Zhong paste (good for 1 loaf without leftover)
Ingredients
50ml water
10gm bread flour

Instructions:
  1. Whisk/stir the water and flour till it is well combined without any lumps
  2. Stir the mixture constantly over medium low heat for about 2-3 minutes until the mixture thickens up and leaves behind traces of 'line' (I guess this statement only true for the gas stove cooker, if you are using induction cooker and stainless steel saucepan, I suggest to use low heat to avoid overburn due to the fast distribution of heat)
  3. Remove immediately from the heat, transfer to a bowl and cover with cling wrap with it touching the surface. Let it cool down completely while you prepare the rest of the ingredients of the bread.
Note: The ratio of bread flour to water is 1: 5, so if you want to make more for keeping or for large quantities just follow the ratio. You may keep it in the fridge without removing the cling wrap. Discard it when you found that it turns greyish colour. 

Tang Zhong bread loaf
250gm bread flour
3 tbsp sugar
3 tbsp milk powder
1 tsp salt
1 tsp instant yeast
1 egg lightly beaten
100 ml water (I've used blended strawberries and milk)
20 gm butter
1 batch of Tangzhong

Instructions:
  1. Place the Tangzhong, water/milk, egg into the bread tin. (I omitted water and replace with crushed fresh strawberries with milk).
  2. Add in the flour, and then place the sugar, salt, butter and milk powder in each corners of the bread tin.
  3. Lastly, make a well in the middle of the bread tin and place the instant yeast in it.
  4. Select white loaf function if you are making white bread or according to what are making (I am using fruit/vege function, 750gm, light crust)
  5. When you hear the second 'beep' (Joyoung bm), add in your preferred fruits/nuts. In my case I've added cranberries, raisins, sunflower seeds and pumpkin seeds
Happy baking!
Pin It Now!

Thursday, 19 March 2015

Mini/Bite Size Wholemeal Parmesan Cheese Bun

I always store baking and cooking stuff in case I need them and will comes in handy. However I always have to throw all the the rotten stuff because I've forgotten what I've bought previosly. Lately,when I throw the mozarella and cream cheese and I've found that the Parmesan cheese is going to expire soon. In order not to waste it, I've googled for a good recipe. I saw this bite size Parmesan cheese bun from a few blogs and I've decided to give it a try by using my bread machine. The first blog that I came accross is from Sze Min's blog and the second is from yukiecody and from a few others too. I've made some changes to the recipe as I don't have enough bread flour and substituted with wholemeal flour and added more Parmesan cheese as compared to theirs. (The actual recipe is by Carol Hu, a popular Taiwanese baker/author.)

Mini/Bite Size Wholemeal Parmesan Cheese Bun
Yield: 23 mini buns
Wet Ingredients
80gm milk
1 beaten egg

Dry Ingredients
200gm bread flour (I've used 142gm hi-protein bread flour and 58gm unbleached whole meal flour)
1/3 tsp yeast
30gm sugar
2 tbsp shredded Parmesan cheese  (I've use 4tbsp finely chopped Parmesan cheese)
To be added later
30gm cold butter (cube)
1/8 tsp salt
Instructions:
  1. Add all the wet ingredients into the bread machine (bm), followed by the dry ingredients and make a hole in the center to contain the yeast.
  2. Choose 'Dough' function on the bread machine and press 'Start'
  3. After 25 mins (I'm using Joyoung bm), the bm will stop and you may add in the butter and the salt.
  4. Choose 'Proofing' function and let it knead and proof for 1 1/2 hrs (1st proofing). During kneading period, you'll find that the dough is quite oily and sticky at this time but fret not.
  5. Take out the dough after that and gently punch the dough to release the air in it. Shape it round and cover with cling wrap and proof for 15 mins
  6. Roll out with 1 cm thickness and cut into 2cm x 2cm small squares, place them apart and proof for another 50-60 mins. (I just shape it round and let it proof)
  7. Egg or milk wash the surface. (I use egg wash method)
  8. Bake in a pre heated oven at 180 degree C for 12-15mins
Happy Trying !!

Pin It Now!

QJ 1st Birthday vs 2nd Birthday

Hi all,

Last year has been a busy year for me. With QJ growing up and coping between my personal life, career and dream made my life packed. Juggling between career, dreams, interest and baby equals to hectic yet interesting life. Life has never been easy and full of learning curve, at that moment I'm learning to be a good wife then a preggy and now a mother.

I've always wanted to post up his 1st birthday celebrations which I've drafted last year's January so that it will be recorded but due to my packed schedule I've never made it till today. We've celebrated QJ 1st birthday last year and in a blink his 2nd birthday passed too. Both his 1st and 2nd birthday are quite successful at least in a way which satisfy me.

For his 1st birthday I've made him a two tier birthday cake, cupcakes, elephant and elephant sugar cookies all according to the blue-greyish elephant theme. While this year we held a Pororo theme birthday for him. I've bake him a Pororo & friends cake. It's easier for me this year as I just bake his cake and the rest of the cupcakes and dessert were bought. I guessed he enjoyed both his birthdays very much as he got to ate sweet things, play with his peers and received many gifts. However we did not manage to take as many photos as compared to last year as he cannot stand still and always on the move now.

QJ Cheeky Faces
QJ and his 'auto' members
Daddy, mummy and QJ
Daddy, mummy and QJ
QJ 2nd birthday
Pin It Now!

Monday, 12 January 2015

Red Velvet Cheese Cake for Hubby's Birthday

Hubs and my sis birthday are on the same date. I am too busy last year and just got to post this now although their birthday already passed for 4 months. I planned to bake two cakes initially but later I've changed my mind to bake only one as I will be throwing a family gathering party with steamboat dinner. After giving a thought, I've made up my mind to bake a red velvet cheese cake with a surprise for both of them. They have a common interest in photography so I make a cake which resembles a camera figure.

Red Velvet Cheese Cake
Yield: 8" cake

Ingredients
2 1/2 cups (250 grams) sifted cakeflour
1/2 teaspoon salt
2 tablespoons (15 grams) regular or Dutch-processed cocoa powder
1/2 cup (113 grams) unsalted butter, at room temperature
1 1/2 cups (300 grams) granulated white sugar
2 large eggs
1 teaspoon pure vanilla extract
1 cup (240 ml) buttermilk
2 tablespoons liquid red food coloring
1 teaspoon white distilled vinegar
1 teaspoon baking soda

Cream Cheese Frosting:
1 - 8 ounce (227 grams) cream cheese, room temperature
1 - 8 ounce (227 grams) tub of Mascarpone cheese, room temperature (I omitted this)
1 teaspoon pure vanilla extract
1 cup (115 grams) confectioners' (icing or powdered) sugar, sifted (I use 80gms)
1 1/2 (360 ml) cups cold heavy whipping cream (contains 36-40% butterfat)

Preheat oven to 175°C (180°C) and place rack in center of oven. Butter two 9 inch round cake pans (I use two 8” and 1 retangle pan) and line the bottoms of the pans with parchment paper. Set aside.  

Red Velvet Cake
1. In a mixing bowl sift together the flour, salt, and cocoa powder. Set aside. 
2. In bowl of your electric mixer, or with a hand mixer, beat the butter until soft (about 1-2 minutes). 
3. Add the sugar and beat until light and fluffy (about 2-3 minutes). 
4. Add the eggs, one at a time, beating well after each addition. Scrape down the sides of the bowl. 
5. Add the vanilla extract and beat until combined.
6. In a measuring cup whisk the buttermilk (milk+vinegar) with the red food coloring. 
7. With the mixer on low speed, alternately add the flour mixture and buttermilk to the butter mixture, in three additions, beginning and ending with the flour. 
8. In a small cup combine the vinegar and baking soda. Allow the mixture to fizz and then quickly fold into the cake batter. 
9. Working quickly, divide the batter evenly between the two prepared pans and smooth the tops with an offset spatula or the back of a spoon.
10. Bake in the preheated oven for approximately 25 - 30 minutes, or until a toothpick inserted in the center of the cakes comes out clean.
11. Cool the cakes in their pans on a wire rack for 10 minutes.
12. Place a wire rack on top of the cake pan and invert, lifting off the pan. 
13. Once the cakes have completely cooled, wrap in plastic and place the cake layers in the refrigerator for at least an hour (or overnight). (This is done to make filling and frosting the cakes easier.)

Cream Cheese Frosting:
 In the bowl of your electric mixer, or with a hand mixer, beat the cream cheese and mascarpone cheese until smooth. Add the vanilla and confectioners’ sugar and beat until smooth. Using the whisk attachment, gradually add the heavy cream* (See Note) and whip until the frosting is thick enough to spread. Add more sugar or cream as needed to get the right consistency.

Assemble: With a serrated knife, cut each cake layer in half, horizontally. You will now have four cake layers. (I made two layers and cut out a camera figure) Place one of the cake layers, top of the cake facing down, onto your serving platter. Spread the cake layer with a layer of frosting.  Place another layer of cake on top of the frosting and continue to frost and stack the cake layers. Frost the top and sides of the cake. You can garnish the cake with sweetened or unsweetened coconut. Serves 10-12 people.

Note: You must use a brand of heavy cream that whips very easily to stiff peaks. If you are using a brand of heavy cream that does not whip easily to stiff peaks then whip the heavy cream separately to stiff peaks and then fold it into the cream cheese mixture.


Pin It Now!

Tuesday, 7 October 2014

Homemade Penang Muah Chee

Muah Chee or Muar Chee is a Penang local delicacy made of glutinuos rice and coated with ground roasted peanuts,  granulated sugar and top with fried shallots. My mum and I used to made when I'm a teenager as my family love muah chee so much. I've tried many stalls in KL but still can't compare to those we found in Penang. After so long I've decided to give it a try. Making the glutinuos rice is quite easy but the problem is the process of removing the peanuts skin after toasting it in the oven is quite time consuming. But if we are chasing for the true taste then we shall made all from scratch, otherwise you may buy those roasted peanuts and grind it yourself.

Muah Chee 
Serving: 4

Ingredients:

- 120g glutinous rice flour
- 180ml water
- 2 tablespoons of peanut/shallot/cooking oil
- 150g of peanut/sugar mix (use granulated sugar as per your preference)
- 4 cloves of shallot 

Instructions:

1. Mix the glutinous rice flour, water and oil in a deep dish and steam for 25 minutes. Once the mixture is set and turn to sticky white paste then its ready. Brush the dough with a little oil. Leave to cool down slightly.
2. Then put the peanuts in a baking tray and bake at 180C until it turn golden brown. Place the peanuts and in a blender/food processor and grind to a fine mixture (or you may buy ready-made). Place the peanut mix on a big plate/tray and cut a desired amout of the sticky paste onto the peanut mix and cut it to small pieces for more even coat.
3. Pour the peanut/sugar mix into another bowl. Cut the sticky paste into small cubes and coat them well with the mix.
4. To make shallot oil, thinly sliced the shallots. Fry with 2 parts oil to 1 part shallot till golden.


Pin It Now!

Saturday, 4 October 2014

Easy Homemade Pasta from Scratch

I've wanted to make pasta for my son QJ months ago but I just can't met the right timing. Finally I managed to make the spinach pasta last Sunday.

Easy Handmade Spinach Pasta
Serving: 2 adults & 1 toddler
Ingredients
1 egg
4tbsp all purpose flour (to be adjust later according to dough texture) 
Spinach juice (blend a few spinach leaves with some water)

1/4 black pepper
1/4 salt (you may omit)
1/4 olive oil

Instructions:
There are two methods:

Grandma's way
1. Sift the flour on your working/table top and make a well in the middle of the flour. 
2. Crack an egg into the well and add in salt, black pepper, spinach juice, and olive oil.
3. Beat the egg with a fork and mix in the flour from the side bit by bit until all ingredients are well combine.
4. If the dough is too wet, add flour or if it's too hard or crumbly add a little bit of water or the spinach juice and knead the flour by flattening and folding for a few times till it is smooth. It is ready when it doesn’t stick to the bowl/working top/hand.
5. Cover the dough with cling wrap and let it rest for 30 min.
6. For handmade pasta: Cut out the dough in 3 portions and sprinkle the baking sheet/silicone mat with some  flour and use a rolling pin to roll the dough back and forth until it reaches the thickness you prefer. (You may use a pasta maker to roll the dough).
7. For handmade pasta: Then fold the dough to 's' and cut it into thin strips and unfold it. Continue until the remaining dough is cut out.
8. Voila, the pasta is done. The pasta is best to cook immediately or can be keep in a zip lock bag/airtight container in the fridge for a week or up to a month in the freezer. (keep it at your own discretion)
9. To cook the pasta, pour in the pasta in a pot of boiling water and cook it until al-dente (chewy texture).

Easy way
1. Add in egg, black pepper, olive oil, salt and spinach juice into a food processor or a mixer (with paddle attachment) and let it mix well.
2. Then add in flour into the mixture and let it pulse or mix until well combine.
3. Refer to grandma's way item no. 4 - 9
Happy Trying !!

Pin It Now!

Monday, 29 September 2014

Fresh Strawberry Cupcake

I spotted beautiful strawberries selling at RM12.90 per 500gm, quite cheap and the quality is good too, so it's a good deal. I thought of baking cupcake for my son as he loves cakes, I guess homemade fresh cupcake will be better than those commercial cake bought from the market. The recipe is taken from here with some modifications.

The cupcake turn out to be moist, fluffy and it taste so so good with the cream cheese frosting.  It's yummy and QJ just love it so much!

Fresh Strawberry Cupcakes
Yield: 22-28 cupcakes (depend on mould size)
Ingredients
Cupcakes
1 2/3 cups flour (I use  280gm)
1 cup sugar (150gm)
1/4 tsp baking soda
1 tsp baking powder
3/4 cup butter, room temperature (171gm)
2 eggs
2 tsp vanilla (omitted but still taste good)
1/2 cup sour cream (substitute with natural yogurt)
1/4 + 1/8 cup milk (90ml)
3/4 cup chopped strawberries (150gm)

Icing (I use cream cheese frosting from here)
1/2 cup salted butter
1/2 cup shortening
4 cups powdered sugar
6 tbsp strawberry puree
1 tbsp water or milk, if needed

NOTE: You can replace the shortening in the icing with butter, if preferred
Instructions
1. Preheat oven to 350 degrees/180 D Celsius.
2. Whisk together flour, sugar, baking soda and baking power in a large mixing bowl.
3. Add butter, eggs, vanilla, sour cream and milk and beat on medium speed until smooth.
4. Fold in the strawberries.
5. Fill cupcakes liners a touch more than half way.
6. Bake for 18-20 minutes.
7. Allow to cool for 2-3 minutes, then remove to cooling rack to cool completely.
8. While cupcakes cool, make the icing. Beat together butter and shortening until smooth.
9. Slowly add 3 cups of powdered sugar. Mix until combined.
10. Mix in the strawberry puree.
11. Add the rest of the powdered sugar and mix until smooth. Add water or milk until icing is desired consistency.
12. Once cupcakes are cool, pipe on the icing.

Note: I omitted step 8-12 and replace with cream cheese icing.

Pin It Now!

Friday, 29 August 2014

White Plain Pau (Chinese Steamed Bun) vs Sweet Potato Mantou

Rabbit, Piggy and Rolled Steamed Bun
I've wanted to make some mantou or pau (chinese steamed bun) for my son since long time ago as he has sweet tooth and love to eat cakes, biscuits etc which his grandma or aunts bought from the roadside stall. I think those stuffs are too sweet for a 1 year old toddler and I prefer him to eat healthier food. So I've googled for the recipe and came across two recipes which I wanted to give it a try, one for plain pau and the other one sweet potato mantou. 

The pau turn out to be a bit dry compare to the sweet potato mantou maybe because I didn't cover-up the remaining dough while I'm working on it and secondly I didn't work fast enough and let them sit for too long before steaming. I've used both red bean (for adults) and homemade steam sweet potato as the filling for both pau and mantau (for my son). As for the sweet potato mantou, I've speed up and also cover up the remaining dough while working and kept the mantous that have been rolled/shaped in the freezer while shaping the others. The freezer method is safer as the shaped mantou won't double the size and hold its shape better. Therefore we can make more and steam it directly without thawing when we feel like eating mantou.

Here are the recipes:-

Sweet Potato Mantou (Steam Buns) Recipe
Adapted from Rasa Malaysia which taken from 
人生加油站 (for Mandarin literate)
Ingredients:
(makes 12)
 
A:1/2 tablespoon (5.5g/0.2 oz) yeast75ml warm water1/2 teaspoon sugar
B:
75g (2.6 oz) sweet potato
250g (8.8 oz) bao flour or Hong Kong flour
4 tablespoons sugar
4 tablespoons oil
Pinch of salt

 Method:
1.    Combine the yeast, sugar and warm water in a bowl. Stir to mix well. Set aside for 20 minutes. The yeast mixture will rise and becomes foamy.
2.    Steam the sweet potato until soft, discard the water that seeps out after the steaming. Using a spoon, mash the sweet potato into a puree.
3.    Add the sweet potato puree and all the ingredients in B and also the yeast mixture and mix using a stand mixer on low speed, for 20 minutes. You can also knead with hand for the same time or until the dough doesn’t stick to your hand. Transfer the dough out of the stand mixer and lest rest/proof for 45 minutes, covering it with a damp cloth. (Note:
4.    Dust the surface with some flour and divide the dough into 3 equal portions. Make each portion into a log. Use a rolling pin to flatten the dough to a somewhat rectangle shape. Wet the surface of the dough with just a wee bit of water, using a pastry brush or your hand.
5.    Roll the dough up tightly (this is important so the mantou remain a nice shape after steaming), into a log.
6.    Cut the dough into 4 or 5 equal pieces, in mantou shape and place them on 2-inch by 2-inch baking or steaming paper sheets. Repeat the same for the remaining two portions. You will make a total of 12-15 small mantou.
7.    Bring your steamer to a boil and steam the mantou in batches, for 12-15 minutes

Steamed Buns with Red Bean Paste
Adapted from Happy Home Baking

Ingredients:
(makes 12) 
300g Hong Kong pau flour
3g baking powder
3g instant yeast
30g caster sugar
160ml water
15g vegetable oil
120g red bean paste / 120g sweet potato paste


Method:
1.             Sieve Hong Kong pau flour and baking powder into a mixing bowl. Add yeast, caster sugar and mix well.
2.             Make a well in the centre of the flour mixture, add in water and mix to form a dough. Transfer dough onto a lightly floured work surface. Knead dough until it becomes smooth (about 5 mins). Knead in the vegetable oil and continue to knead for another 10-15 mins or until the dough becomes smooth and elastic.  Take a piece of dough  (about the size of a table tennis ball) and stretch it, you should be able to stretch it  to a fairly thin membrane without tearing off easily, if not continue to knead for another 5 to 10mins.
3.             Roll dough into a smooth round, place in a lightly greased mixing bowl, cover with cling wrap and let it proof for about 15mins. 
4.             Punch down the dough and give a few light kneading to release the trapped air bubbles. Divide the dough into 12 portions (about 40g each). Roll each portion into a smooth round.
5.             Flatten each dough into a small disc with your palm or a small rolling pin, make the edges thinner and the centre portion thicker. Wrap each dough with 20g of red bean paste. Pinch and seal the seams. Place dough seam side down on a square piece of parchment paper. Cover loosely with cling wrap and leave buns to proof for 20-25 mins.
6.             Place buns in a steamer* and space them apart so that they do not touch one another. Steam at medium to high heat for 12mins (make sure the water is already boiling before steaming). When ready, remove the lid carefully to prevent water from dripping over the buns. Remove immediately and serve warm. Keep any leftovers in fridge (covered with cling wrap or store in airtight containers) and re-steam till hot before serving.

My note (little adjustment from the referred recipe)
  • I used bao flour or Hong Kong flour for both pau and mantou.
  • For best results and accuracy of the recipe, please use the metric measurement.
  • All purpose flour and cake flour should work just fine, but I have not tried this recipe using all purpose flour or cake flour therefore I don’t know the end results.
  • Make sure you have new yeast, as old yeast will not rise/proof properly.
  • Use warm water to activate the yeast. It’s important.
  • The texture of the mantou is very soft and fluffy mantou compare to the pau
  • Steam the bun you wish to eat and keep the remaining in the freezer without steaming it first. You may steam whenever you want to eat it
  • You may make your own red bean paste but here I’ve used the store bought ready-made red bean and made extra sweet potato paste for the fillings.
Pin It Now!